These Sugar cookies will make you shine during Christmas! They can be made whenever the mood strikes and yield the most delicious, chewy, soft sugar cookies ever.
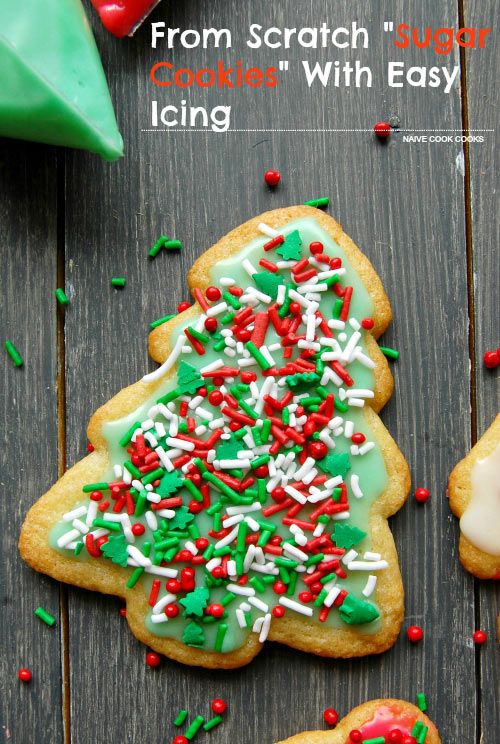
I love cookies. But not the super crispy, hard as a rock kind. I have an affinity for soft chewy cookies and after destroying almost 2 batches, I found the perfect sugar cookie recipe. These cookies are a dream to work with. The dough rolls like a dream, super easy to cut out your favorite shapes and the BEST PART : you don’t have to wait for hours for them to get chilled before you can make them. Just 30 minutes chilling time is all you need!
They taste exactly like soft chewy sugar cookies with a little crispy edges. PERFECTION.

My travelling starts from tomorrow with us having only 2-3 days at home before Christmas. So I wanted to make sure we make homemade cookies, decorate our tree finally, finish Christmas gifts shopping before we head out. So here we are with me gone for the next 3 days. We have started decorating our tree (always a good sign!), I made us sugar cookies (A Christmas tradition we ought to maintain!) and we have started our Christmas gift shopping! No too bad?!
These cookies turned out so good that I lost count of the amount of sugar and butter I consumed during the exact 1.5 days that they lasted! It’s the season folks so lets not think about carbs, calories. Such words just don’t go along with the holiday spirit!

Now once you are done with cookie making, comes the fun part! DECORATING. Here we are going to be making our own icing for decorating these cookies. Don’t you run away! I am telling you that this icing is the easiest icing you can whip in a matter of 5 mins and it tastes delicious too. I always had a problem with icings tasting too sugary ( HA, who am I kidding?! Icing is almost sugar anyways!) but not with these. A drop of vanilla extract makes the icing tastes oh so delicious!

And if you are in no mood to clean the icing stucked dishes, simply use disposable glasses, spoons and zip locks (like I did) which will make the decorating task so much more fun without the headache of cleaning tons of dishes. Regarding icing colors just go to town with all the possibilities and let your imagination run wild. Get some help if you are lucky enough and this will be a fun holiday project!


Show me your cookie creations on instagram by using #naivecookcooks. All the creative souls out there, get sugar cooking!
- Sugar Cookies Dough
- 1&1/4 cups + 2 Tbsp unbleached all purpose flour
- 1/2 tsp baking soda
- 1/4 tsp baking powder
- 1 stick unsalted butter, softened just enough
- 3/4 cups white granulated sugar
- 1/2 egg, stirred
- 1/2 tsp vanilla extract
- 1-2 Tbsp milk (any fat content)
- Easy Icing Recipe (DOUBLE THE ICING RECIPE if going to decorate all 2 dozen cookies)
- 1 cup powdered sugar
- 2-3 Tbsp water
- 2 tsp light corn syrup
- 1/2 tsp vanilla extract
- Food coloring (I used red, green)
- Preheat oven to 375F.
- In a small bowl, stir together flour, baking powder and baking soda. Keep it aside.
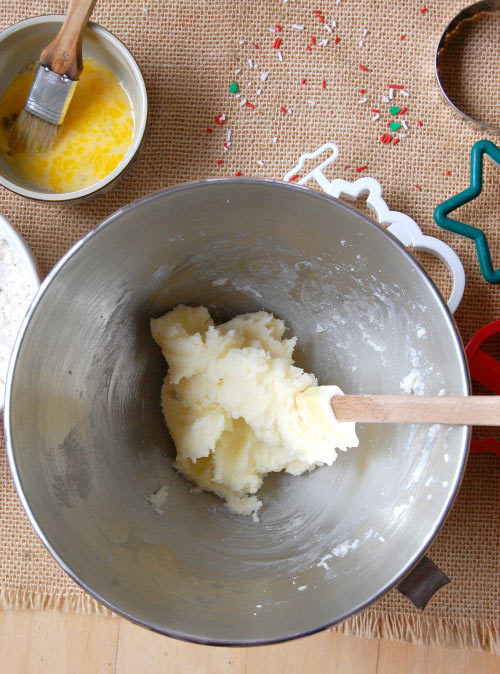
- In a large bowl or bowl of stand mixer if using, cream butter & sugar until smooth. Beat in the stirred egg and vanilla. Slowly add the dry ingredients and keep stirring. Add enough milk to make the dough come together, just soft enough but not wet.
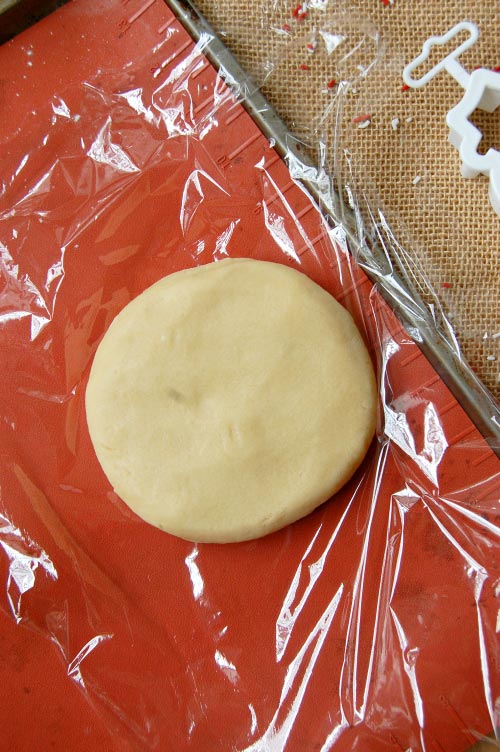
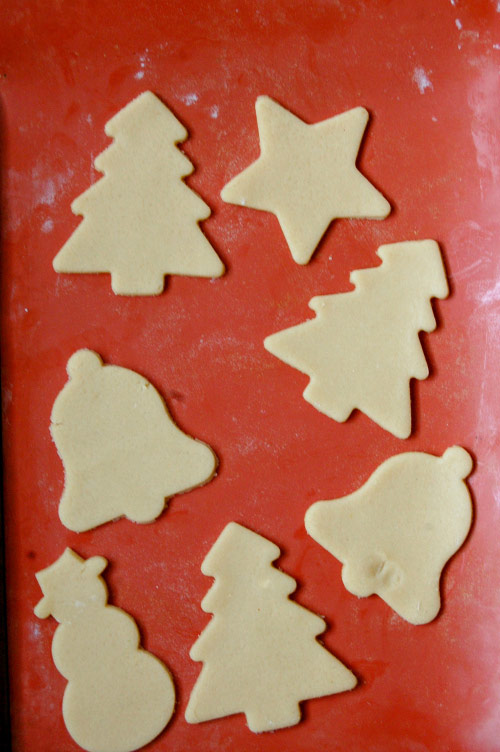
- Gather the dough on a floured surface. If it feels too sticky, add few tsps of flour, starting by 1 tsp at a time and kneading very little. Divide the dough into 2 balls and chill them for about 30 minutes. Roll out the dough to desired thickness. I like rolling the dough to a medium thickness (Not too thin and not too thick) to get a chewy soft cookies but it’s totally about preference. Cut out desired shapes using cookie cutters and transfer the cut out cookies to a lined baking sheet. Bake cookies by rotating the tray halfway for about 6-8 minutes depending on your cookie thickness. I suggest keeping an eye and as soon as you see the top getting little bit golden, take them out. (You can bake just 1 cookie as I do initially to test and get a hang of your oven!). It always helps. Learnt after burning 2 whole batches of these cookies (I ended up baking the cookies for a total of 6 minutes with rotating halfway to achieve the perfect chewy soft cookie texture). Let them cool on baking tray for few minutes and then transfer to a cooling rack for cooling completely.
- Icing the cookies.
- In a disposable glass or bowl (if using or regular), add white powdered sugar. To it add water 1 tbsp at a time and keep stirring. Add corn syrup and vanilla extract and stir again until smooth. If you feel the icing is too thick, you can add more water slowly. If too thin, add powdered sugar.
- Divide the icing in 2-3 disposable glasses if going to add colors. Add your desired color in the icings and mix well. Remember that a drop of food coloring goes a long way so start by adding a drop, mixing really well and to reach your desired color move ahead by adding color drop by drop.
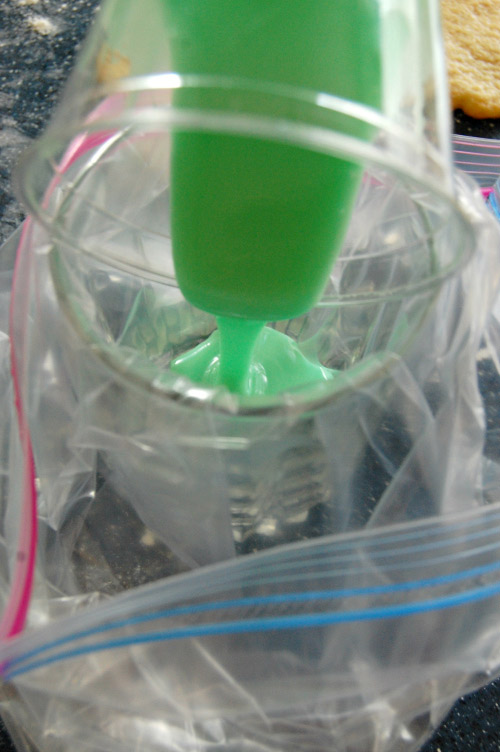
- To apply icing on the cookies, I find it easiest to do in ziplock bags. As shown in the picture above, in a clean glass stuff one corner of the zip lock bag and add the icing. Twist the bag around that corner and cut a very very small hole on that corner using scissors. Make sure the hole is not too large or it will be hard to make outlines.
- Decorate the cookies. I like making outlines first and then filling or flooding the cookies by squeezing some icing in the center of the cookie and spreading it using back of a spoon.
- Decorate with sprinkles if using.
- Let the icing set overnight. No need to cover the cookies. Next day once icing is all set, store the cookies in an airtight container.
More Cookie recipes:
Beautiful cookies! Will have to try your no chilling required version. What a time saver! 🙂
You totally should!!
SO pretty!! And I’m loving that icing 🙂 🙂
Thanks Sues!
Your cookies are so beautiful and look so tasty! 🙂
Thanks!!
They are so festive and pretty!
Thanks Angie!
very pretty! 🙂 I made similar icing for decorating my Easter Sugar Cookies!
I love this kind of icing!! I can eat cookies by dozen lol!
Love these sugar cookies, Ami! Yay for no chilling too, I can be so impatient sometimes so this recipe sounds perfect 🙂
Me too Kelly!! Waiting for cookies is the hardest part!
How much white powdered sugar do I use ??
Angela it says in the recipe to use 1cup powdered sugar for icing! Hope this helps! 🙂
Do you need the egg??
You can replace egg by chia/ flaxseed egg!
Love your festive Christmas cookies!